Getting familiar with Praat or WaveSurfer and basic properties of speech signal
Record a few utterances in your native language
Record a few utterances using a short stretch of speech of no more than five-seven seconds. In order to do this, run Praat, select [Record mono sound] option from [New] menu. Praat SoundRecorder window will show up. Start recording by pressing [Record] button and stop it by pressing [Stop]. Then press [Save to list] button in the SoundRecorder Window.
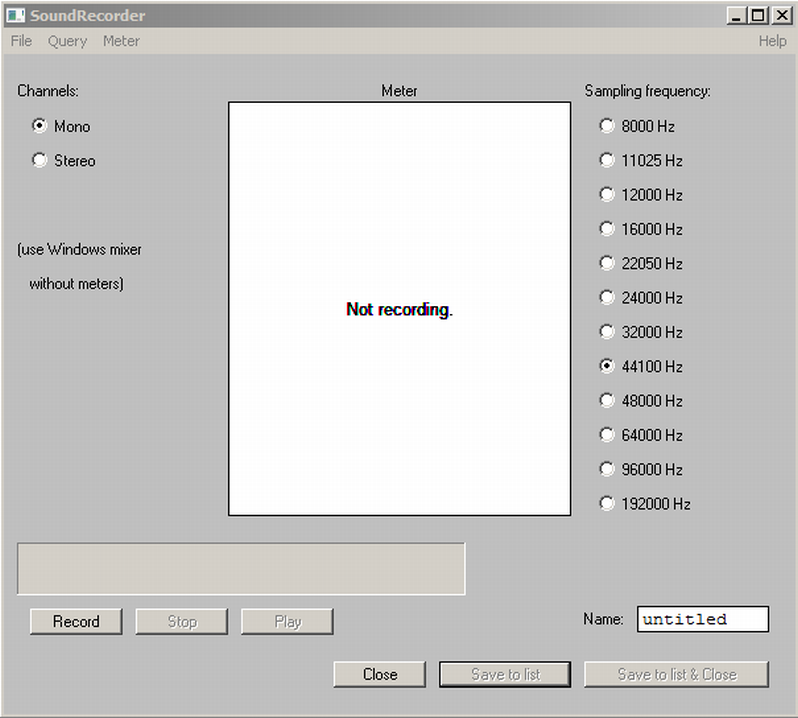
Figure 1. SoundRecorder Window. You can record sounds here and export them as “objects” to the list of objects in the main (object) window of Praat. You can choose between stereo and mono recording and among a number of sampling frequencies (this may depend on your sound card).
Close SoundRecorder. A new object will apear in the Praat Object window. Select it (using mouse) and press [View & Edit] button from the right panel. A new window will open. It will contain a graphic representation of the signal. Now you can choose which aspects of the signal you want to see. Choose and activate [Spectrum] and [Pitch] views if they are not open by default. Spectrum (ghost-like clouds) represents the distribution of energy in the signal frequencies over time and Pitch (blue line) represents the value of the pitch frequency which roughly corresponds to the perceived height of the voice. Please note that when these two types of analysis are chosen simultaneously, they have separate vertical axes. The one values for spectrum may reach thousands of Hertz while the ones for pitch will reach only a few hundred Hertz. In order to avoid delays in scrolling, Praat has a preset limit for the width of the visible section of the signal. You can set in the [View] menu (use [Analysis] option). If you set it to, say, five seconds, and then you select a seven second long stretch of recording, you won’t see any analyses besides oscilogram. The selection must be shorter than the pre-set maximum time window.
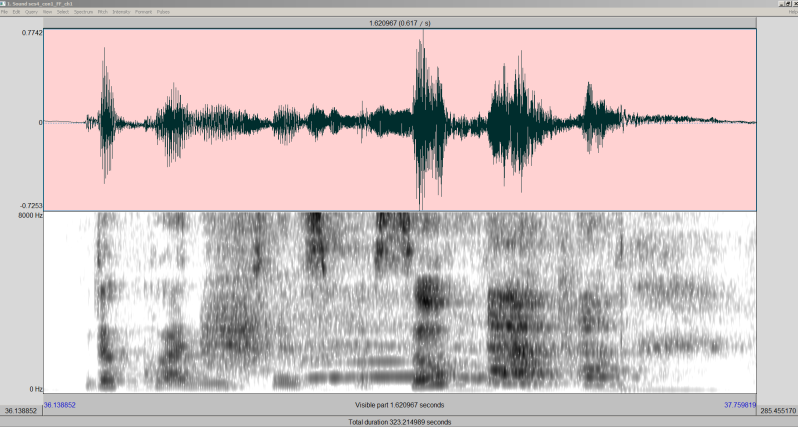
Figure 2. Remember that you can zoom in and out using the buttons in the lower left corner of the window. You can play any section of the signal by choosing it (use the mouse) and pressing the respective section of the bar below (there are three bars used for various playing modes selected parts, whole visible part and the complete recording.)
Now take a closer look at the spectrogram and:
Check what kind of sounds are represented by dark clouds in the upper parts of the spectrum?
[“Clouds” that are really high on the frequency scale normally correspond to various voiceless noises, e.g., in consonants like snow or shadow. The “clouds” that are located much lower may be rather associated with regular, voiced vowels.]
Check if there is any clearly visible dark vertical line. What kind of sound it is associated with it?
[Plosive consonants are represented as clear vertical lines that are sharper on their left hand side while on the right, they tend to neighbour with a “cloud” marking some other speech sounds (a vowel on most occasions). Clicks also correspond to vertical lines but they tend to be weaker.]
See whether there are any less clear but still distinguishable vertical shapes in the spectrogram? Listen to these portions of signal. What kind of sounds do they represent? Note that even in the sections of silence (if there are any), there is some kind of fog or dirt visible in the spectrogram. In most cases, it is just background noise.
[In most cases, vertical lines corresponds to plosive consonants like /p/ or /b/. Actually, we produce a small explosion of air when producing them. We increase the pressure in the vocal tract and then suddenly release it.]
Look for sections of the spectrogram which seem to be almost “empty” (almost – because there is always something there – traces of noise etc.). You may find that some of them – although rather short – occur even within words and tend to precede the vertical dark lines in the spectrogram. Can you guess why?
[Before plosive consonants like /p/ or /b/ there is always a brief moment of silence. We need it to produce the plosion. One keeps her/his lips tight together to prevent air from coming out, increases the pressure inside the mouth and then releases her/his lips.]
Then focus on the blue pitch contour line:
Is it completely continuous throughout entire signal you recorded? Are there any sections where it disappears? If yes, where? Does it happen also within your utterances? If yes, listen closely to these portions of utterances and try to guess what kind of sounds occur there.
[Pitch contour is obviously not present in pauses but it also cannot be calculated for unvoiced portions of the signal. When vocal folds vibrate irregularly, pitch frequency can hardly be extracted and serious errors may occur.]
Open Praat Sound Recorder again and record the same two or three sentences but this time in whispering voice. Try to speak clearly but be careful to keep the “whispery” quality of your voice. Do not close the initial analysis window and open the new signal in another one. Now you can directly compare these two spectrograms:
- Can you hear the melody of the whispered utterances?
- Could you mimic this melody using your regular, “voiced” voice?
- Please ask your friend to mimic it and record her or his voice.
[Strictly speaking, there is no pitch frequency in whispered utterances so, one may think, we do not have any basis for perceiving its melody. However, it is not exactly like that! Something makes us hear the melody. This phenomenon is partially based on some properties of the whispered speech and largely on the mechanisms of speech perception. On the basis of some other acoustic properties of whispered speech, we reconstruct (or hypothesize) its melody.]